Hands-On with Terraform Part I: Creating a DigitalOcean VPC and Droplet
Since you have come up here, I assume you're already familiar with Terraform and perhaps have even heard a thing or two about it. However, for those who haven't, Terraform is an infrastructure as code tool that lets you define your cloud or infrastructure resources in human-readable configuration files that you can version, reuse, and share.
For example, when you're setting up a cloud infrastructure with a server or VPS and a database, there are several ways to do it. One approach is to use the UI provided by popular cloud providers such as AWS, DigitalOcean (DO), or Azure to create a server and database. However, another option is to use Terraform. Using Terraform, you can define your infrastructure requirements in a configuration file and execute it through the Terraform CLI. This approach has several advantages, including the ability to share the configuration with your team and the ease of provisioning and repeatedly destroying the same infrastructure by simply executing the same configuration file.
Terraform has gained massive popularity in the DevOps community, mostly in recent years due to its ability to manage infrastructure in an easy, consistent, repeatable manner. It has enabled engineers and teams to easily track changes to their infrastructure over time, making it easier to rollback to a previous state in case of a failure or to compare changes between environments.
Hence, in this article, we will explore how to create a DigitalOcean VPC and droplets using a straightforward Terraform configuration file and execute it with the Terraform CLI. I will break down each section of the Terraform configuration file in a simple and easy-to-understand manner, and finally, I will show how to execute it.
With that said, let's get started.
The first step is to install Terraform on your machine. You can find the installation instructions and the Terraform executable file at this link.
Now you need to create a directory inside your projects folder. You can name your directory anything. Some suggested names can be infrastructure, provision or terraform .
Once you have created the directory, create a main.tf file inside it This will be the file where we will put all our DigitalOcean server configurations. Inside the main.tf file, insert the following code. But don't worry, I will try to explain each and every block used in this file in a simple manner.
# initialize terraform with digitalocean provider
terraform {
  required_providers {
    digitalocean = {
      source = "digitalocean/digitalocean"
      version = "~> 2.0"
    }
  }
}

# Set the variable value in *.tfvars file
# or using -var="do_token=..." CLI option
variable "do_token" {}

# Configure the DigitalOcean Provider
provider "digitalocean" {
  token = var.do_token
}

# Copy your local SSH key to digitalocean for ssh access to server
resource "digitalocean_ssh_key" "access_ssh_key" {
  name = "access_ssh_key"
  public_key = file("~/.ssh/id_rsa.pub")
}

# Create a VPC
resource "digitalocean_vpc" "terraform_portfolio_vpc" {
  name     = "terraform-portfolio-vpc"
  region   = "sgp1"
  ip_range = "192.168.0.0/16"
}

# Create a new Web Droplet in the sgp1 region
resource "digitalocean_droplet" "portfolio" {
  name   = "terraform-portfolio-droplet"
  image  = "ubuntu-18-04-x64"
  region = "sgp1"
  size   = "s-2vcpu-2gb"
  vpc_uuid = digitalocean_vpc.terraform_portfolio_vpc.id
  ssh_keys = [digitalocean_ssh_key.access_ssh_key.id]
}

# Output droplet's ip address
output "droplet_ip_address" {
  value = digitalocean_droplet.portfolio.ipv4_address
  description = "The IP address of the droplet"
}
Let's look at what each block means in the above configuration.
# initialize terraform with digitalocean provider
terraform {
  required_providers {
    digitalocean = {
      source = "digitalocean/digitalocean"
      version = "~> 2.0"
    }
  }
}
The first block of code in the main.tf file includes an easy-to-understand and simple script that initializes or informs Terraform to use a DigitalOcean provider to provision the infrastructure. Terraform supports many other providers, including AWS, Azure, and GCP, but in this article, we are using a DigitalOcean provider, so, whenever we execute this script, then the terraform will download all the required module that is required to provision infrastructure in the digital ocean.
# Set the variable value in *.tfvars
# file and set do_token value in it
# or use -var="do_token=..." in CLI option
variable "do_token" {}
# Configure the DigitalOcean Provider
provider "digitalocean" {
  token = var.do_token
}
In the second and third blocks, we are declaring a variable "do_token". This block could also be written in a separate file such as variables.tf. Declaring this variable is mandatory, as it authenticates Terraform with your DigitalOcean account. You can get your own "do_token" by logging into your DO account and visiting the API page. You can set the value of this variable in this block itself, but the best practice is to define it on a separate file such as variable.tfvars or using -var="do_token=... in the CLI option. This is because you will need to push this block in a shared git repo and pushing the authentication-related token in a shared git repo is never a good idea. More information on passing the token through the CLI option will be covered in a later section.
resource "digitalocean_ssh_key" "access_ssh_key" {
  name = "access_ssh_key"
  public_key = file("~/.ssh/id_rsa.pub")
}
The above fourth block creates a DigitalOcean SSH key resource. This block simply copies the local SSH public key and shares it with DigitalOcean, allowing easy SSH access to the droplet once it is created.
resource "digitalocean_vpc" "terraform_portfolio_vpc" {
  name     = "terraform-portfolio-vpc"
  region   = "sgp1"
  ip_range = "192.168.0.0/16"
}
In the fifth block of our Terraform configuration, we are creating a Virtual Private Cloud (VPC). A VPC is an isolated section of the cloud computing infrastructure that allows you to launch resources in a virtual network. Meaning that anything you create in a VPC will share the same network for communication. Here under this section, we are defining the name of the VPC in the first line, the region of the VPC in the second region, and the IP range in the last line. You can find the available region of DO in this link and learn more about IP Range here. It is always a good idea to create any of your cloud resources under a VPC.
# Create a new Web Droplet in the nyc2 region
resource "digitalocean_droplet" "portfolio" {
  name   = "terraform-portfolio-droplet"
  image  = "ubuntu-18-04-x64"
  region = "sgp1"
  size   = "s-2vcpu-2gb"
  vpc_uuid = digitalocean_vpc.terraform_portfolio_vpc.id
  ssh_keys = [digitalocean_ssh_key.access_ssh_key.id]
}
Similarly, in the sixth block, we are declaring our definition for the required droplet. We will need to specify the name, image, region and size of the droplet before creating it under this block. The name can be anything you want, but there are limited options for image, region, and size, which can be found using the DigitalOcean API here. The vpc_uuid and ssh_keys used in the above block are retrieved from the resource we have created in the third and fourth blocks respectively. The vpc_uuid is used in order to specify under what VPC we will be creating the droplet and the declaration of ssh_keys will make the droplets accessible from our local machine via SSH.
output "droplet_ip_address" {
  value = digitalocean_droplet.portfolio.ipv4_address
  description = "The IP address of the droplet"
}
Lastly, the output block specifies what the terraform should return after the successful execution of the Terraform script. Here, we are returning or outputting the created droplet's IP address. This block can also be written in another file such as output.tf. Moreover, there are also other available values that you can output such as the droplet's memory, size, etc which can be found here.
Executing the Terraform script
Now that we have discussed each and every block, let's run and create the resource.
Firstly, navigate to it through the terminal and run the terraform init command. This command prepares the working directory for use with Terraform by performing various initialization steps.
Now, you will need to execute the plan command. You can also skip this command. This command is used to generate an execution plan in Terraform and show what Terraform will do if you execute the script. But, note that, if you have not declared the do_token variable in the second block or have not created the *.tfvars file then you need to specify it in the command line like this:
If you have specified
do_tokenthen:terraform plan --var-file="variable.tfvars" # Note: -var-file="variable.tfvars" arg is only required if you are using variable.tfvars file to store your variablesIf you have not specified
do_tokenthen:terraform plan -var="do_token=..."
Lastly, in order to successfully create this resource, Terraform apply command needs to be executed. This will create all the resources planned and defined in your Terraform configuration file. Similar to the terraform plan command, it is important to ensure that the variable has been declared already or not. Please check below on how you need to run this command.
If you have specified
do_tokenthen:terraform apply --var-file="variable.tfvars" # Note: -var-file="variable.tfvars" arg is only required if you are using variable.tfvars file to store your variablesIf you have not specified
do_tokenthen:terraform apply -var="do_token=..."
Finally, after executing the Terraform apply command, the resources specified in your Terraform file should be created. You can verify this by checking your DigitalOcean dashboard where you should see a created VPC and droplet. Additionally, the output of the command should look similar to the image below.
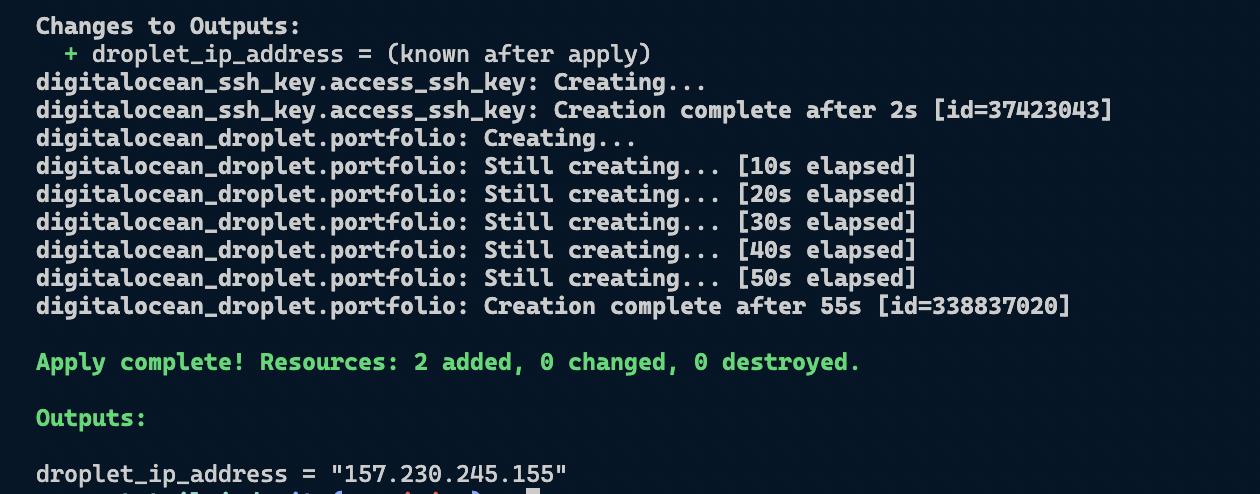
You should now be able to SSH into the created droplet and do whatever you like.
Conclusion
In this article, we discussed how we can create a DigitalOcean Droplet and VPC using Terraform. We covered details on different Terraform script blocks for the creation of our required resources. We also discussed best practices regarding the variable declaration in the Terraform file. By following the steps outlined in this article, you too can create a Droplet and VPC to host your web application.
Finally, If you found this article useful, please consider sharing it with your friends and colleagues. If you have any questions or want to discuss anything related to the topic, please feel free to reach out to me on Twitter or LinkedIn, I would be happy to chat with you.
Thank you for reading.